Virtual Machine Best Practices
Overview
When creating Virtual Machines, there is a staggering and overwhelming amount of options and configurations; knowing which ones are optimal for performance can be daunting. This will NOT be an expansive and conclusive list of all settings, but rather a short and concise list of settings that are generally safe for optimal performance.
Info
THIS ASSUMES YOU ARE USING MODERN HARDWARE WITH MINIMAL LEGACY SUPPORT.
- E.G.
Proxmox VE 7.0or newer (released July 2021).Linux Kernel 5.4or newer (released November 2019).FreeBSD 12.0or newer (released November 2019).Windows 8.1or newer (released October 2013).
Settings
Info
Make sure to select Advanced to be able to view all VM settings.
| Creation Tab | Setting | Value | Explanation |
|---|---|---|---|
| General | N/A | N/A | N/A |
| OS | N/A | N/A | N/A |
| System | Machine | q35 | q35 is newer and supports PCIe. Use i440fx for legacy systems. |
| System | BIOS | OVFM (UEFI) | OVFM virtualizes UEFI and is newer. Use SeaBIOS for classic BIOS and/or ISO's that don't support native EFI boot (e.g., Kali Linux). |
| System | Qemu Agent | Enabled | Allows the Virtual Machine IP address to be visible within Proxmox VM Summary. |
| Disks | Bus/Device | SCSI | SCSI provides faster performance than IDE. |
| Disks | SCSI Controller | VirtIO SCSI single | Provides 1 SCSI controller per disk (faster). |
| Disks | Cache | Write back | Faster than default (no cache), slightly less safe. |
| Disks | Discard | Enabled | Reclaim/trim unused space on physical storage. |
| Disks | IO Thread | Enabled | Allows each disk to have its own thread instead of waiting in queue with everything else. |
| Disks | SSD Emulation | Enabled | Tells guest OS to treat disk as a non-spinning disk. Ignore if using HDD's. |
| CPU | Sockets | 1 | Workstations rarely have more than 1 CPU socket; adjust accordingly (e.g., a SIEM). |
| CPU | Type | host | Improve CPU performance using full host CPU instruction set. Only drawback is inability to migrate to nodes with different CPU architecture. |
| Memory | N/A | N/A | N/A |
| Network | Model | VirtIO (paravirtualized) | Best network performance. Windows VM's require third-party virtio-win drivers. |
Note: booting from the ISO for the first time when using OVFM will require you to quickly press any button on launch. Failure to do so will attempt a PXE boot and drop you into the OVFM menu. To attempt a second ISO boot, press ESC (or type 'exit' in the shell), navigate to 'Boot Manager', select your ISO (e.g., DVD-ROM QM00003), and press any button to boot.
Windows VMs
Creating a Windows VM (with optimal performance) requires attaching a second CD/DVD drive containing VirtIO Windows drivers.
- The most recent virtio-win drivers can be downloaded here.
- Upload the ISO to your node ISO pool just like any other VM ISO.
VM Configuration:
- Configure the Windows VM using the above configuration, but do NOT boot it.
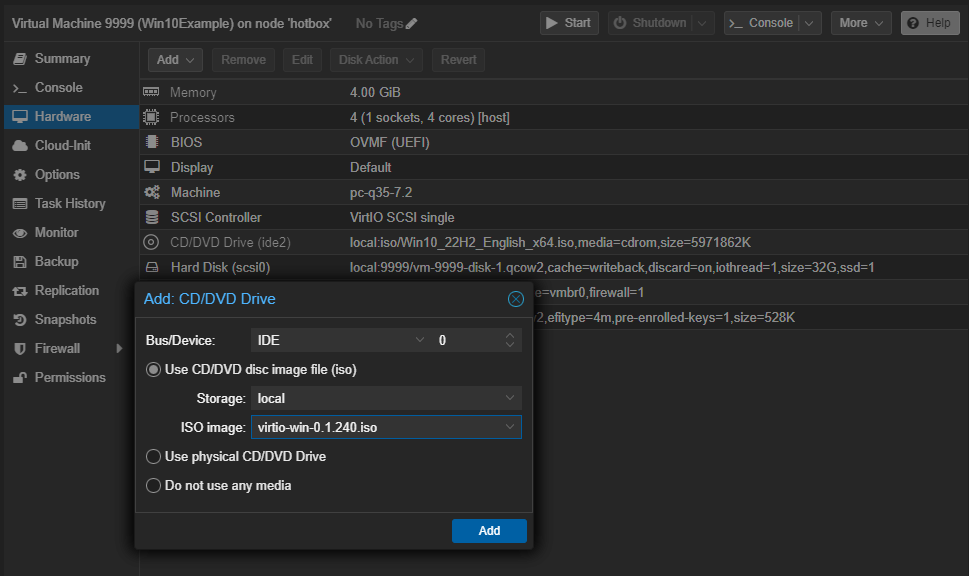
- Before booting, navigate to the
Hardwaretab and selectAdd --> CD/DVD Drive. - Add
virtio-win-0.1.<version>.isousing Bus/Device IDE 0.
Primary Drivers (Pre-Installation):
- Start the VM.
- When selecting the desired type of installation, select
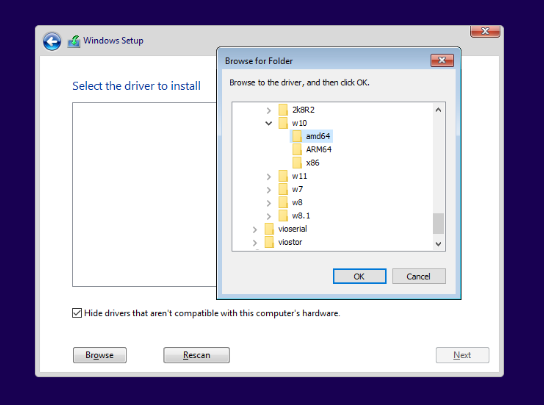
Custom: Install Windows Only (advanced). - Your drives will NOT be shown because the VirtIO drivers haven't been installed yet. Select
Load driver --> Browse --> CD Drive (D:) virtio-win-0.<version> - From here, you will want three drivers (install each before continuing):
- Storage:
vioscsi --> <windows_version> --> amd64 - Networking:
NetKVM --> <windows_version> --> amd64 - Memory:
Balloon --> <windows_version> --> amd64
- Storage:
- Once your three primary drivers are installed, complete the installation normally.
Remaining Drivers (Post-Installation):
- Method 1: via GUI
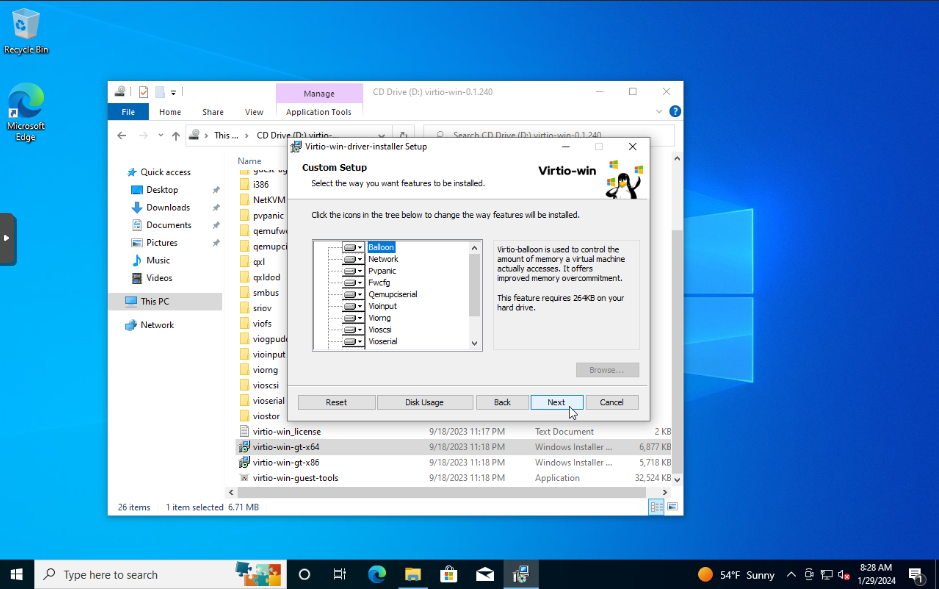
- Once you've made it to the Desktop, open up File Explorer and navigate to the
D:CD Drive one last time to install the remaining drivers usingvirtio-win-gt-x64.msi(and optionally QEMU Guest Agent usingguest-agent\qemu-ga-x86_64.msi).- Leaving the default settings is fine.
- Once installation is complete, reboot your VM.
- Once you've made it to the Desktop, open up File Explorer and navigate to the
- Method 2: via CLI
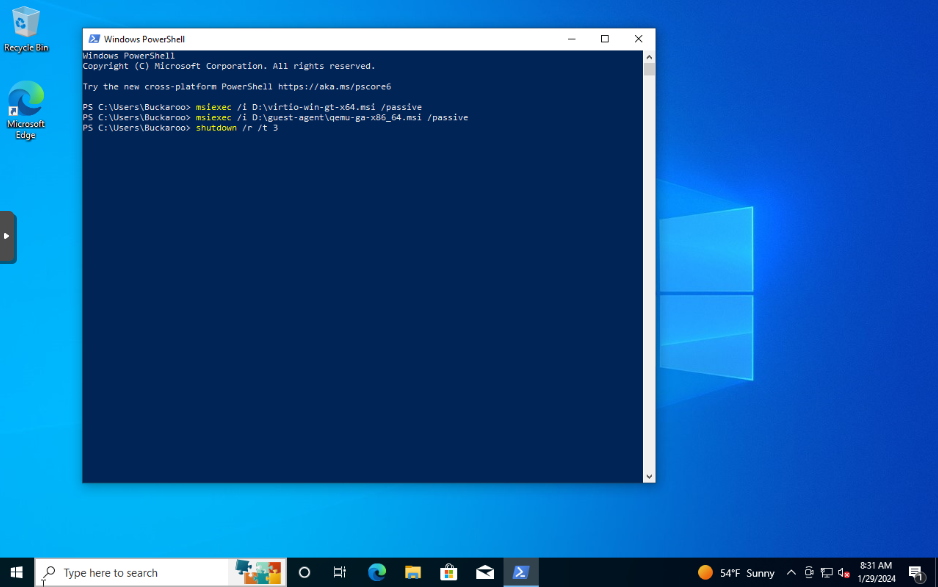
- Once you've made it to the Desktop, open PowerShell and run the following commands:
# Install remaining VirtIO Drivers and QEMU Guest Agent
msiexec /i D:\virtio-win-gt-x64.msi /passive
msiexec /i D:\guest-agent\qemu-ga-x86_64.msi /passive

# Reboot in 3 second
shutdown /r /t 3
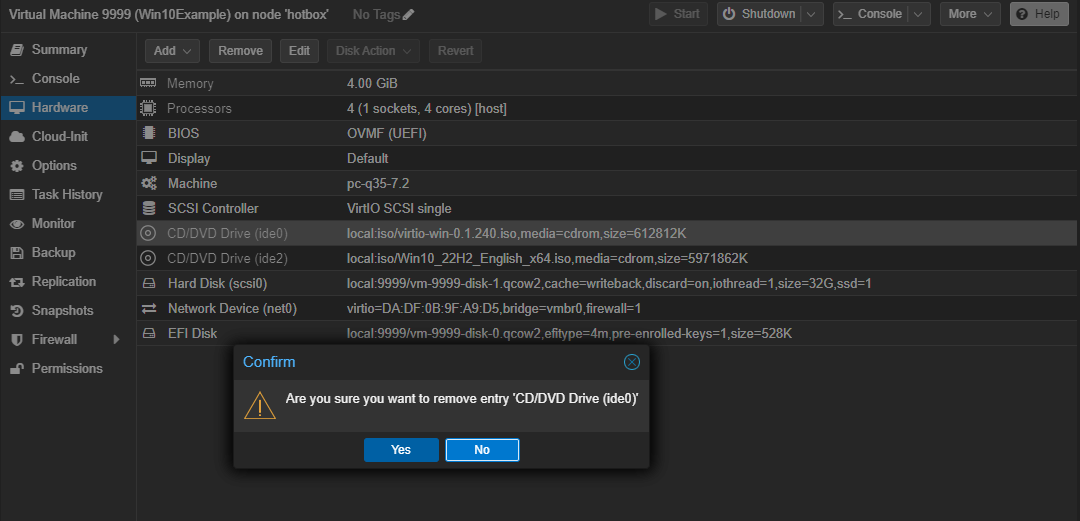
Cleanup & Backup (optional):
- Once your VM has rebooted, gracefully shut down the system.
- Navigate to the
Hardwaretab, select your two CD/DVD drives (the ISO and VirtIO drivers), and selectRemove. - Start your VM, navigate to the
Snapshotstab, and take a new snapshot for your fresh Windows installation.
Note: When using Windows 11 (or any VM that requires TPM to be enabled), snapshots are not available. A workaround for this is to navigate to the Hardware tab, select TPM State, and select Remove. This will allow you to take snapshots while still being able to restart the box. However, if the box is gracefully shutdown it may not be able to start up again (hence why snapshots are recommended).
Underlying Storage
Info
This section is a work-in-progress based on my current understanding.
-
When node storage is using Traditional File System or NFS...
- Copy on Write (CoW) functionality is NOT present natively.
.qcow2VM storage allows for snapshot / backup functionality in a tree-like fashion..rawVM storage allows for maximum performance.
-
When node storage is using ZFS...
- Copy on Write (CoW) functionality IS present natively.
.rawVM storage provides maximum performance, with snapshot / backup functionality still being present but ONLY linearly (not tree-like).