MdBook
Creating your Site:
Note
This example is a manual walkthrough of setting up the Github Pages mdBook Workflow WITHOUT having to setup/use mdbook locally on your own system.
- Steps 2 through 4 are normally done automatically by running
mdbook init. - Using a custom domain name is NOT a requirement for setting up a successful Github Page, but I included it in this repository for the sake of completion and vebosity. To skip custom domain configuration:
- Remove the
[output.html]section frombook.tomlin step 4. - Skip steps 8 and 9 entirely.
- Remove the
1. Create a repository.
2. Create a src directory.
3. Place all Markdown files (aka the site contents) into the src directory.
- The root
.mdfile should beSUMMARY.md. - Formatting documentation can be found here.
- Example
SUMMARY.md:
# Summary

# Primary Section
- [mdBook Github Page Creation](Primary%20Directory/mdBook_GithubPages_Creation.md)

# Secondary Section
- [Obsidian Markdown Comparison](Secondary%20Directory/Obsidian_Markdown_Comparison.md)

# Tertiary Section
- [Export-Obsidian.ps1](Tertiary%20Directory/Export-Obsidian.md)
4. Include a simple book.toml
- Your custom domain name should be included.
- Simply remove the
[output.html]section to avoid custom domain configuration. - If no domain name is specified, Github Pages will opt for:
https://<username>.github.io/<repository> - Example
book.toml:
[book]
authors = ["Tyler McCann (@tylerdotrar)"]
language = "en"
multilingual = false
src = "src"
title = "Example mdBook Site"

[build]
build-dir = "public"

[output.html]
cname="example.hotbox.zip"
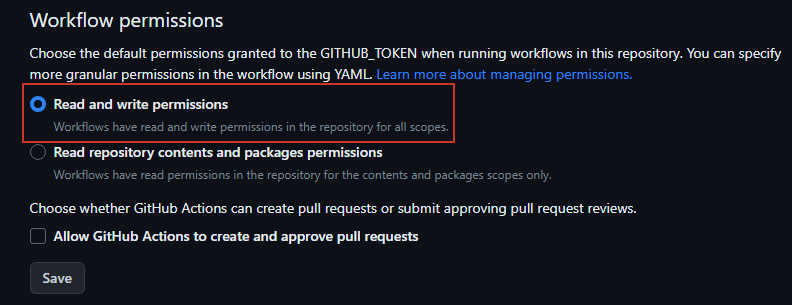
5. Enable 'Read & Write Permissions' for Workflows using the GITHUB_TOKEN.
Repository --> Settings --> Actions --> General --> Workflow Permissions

6. Create mdBook Workflow (mdbook.yml)
Repository --> Actions --> Pages --> View All --> mdBook --> Configure- The default deployment yelled at me, so I opted for a simpler, custom
mdbook.yml. - You should be able to copy and paste this example file verbatim.
- Example
mdbook.yml:
name: Deploy mdBook Github Pages

on:
  push:
    branches:
      - main
  pull_request:

jobs:
  deploy:
    runs-on: ubuntu-20.04
    concurrency:
      group: ${{ github.workflow }}-${{ github.ref }}
    steps:
      - uses: actions/checkout@v2

      - name: Setup mdBook
        uses: peaceiris/actions-mdbook@v1
        with:
          mdbook-version: '0.4.21'
          # mdbook-version: 'latest'

      - run: mdbook build

      - name: Deploy
        uses: peaceiris/actions-gh-pages@v3
        if: ${{ github.ref == 'refs/heads/main' }}
        with:
          github_token: ${{ secrets.GITHUB_TOKEN }}
          publish_dir: ./public
7. Set your Github Page deployment to the 'gh-pages' branch.
- The 'gh-pages' branch will be created by the
mdbook.ymlworkflow (assuming no errors occur). - Once it is created, you can set that branch as your deployment branch.

8. Create a CNAME record to point your custom domain to the Github Pages site.
- Documentation on configuring subdomains with Github Pages can be found here.
- This step will vary for everyone, so below is my experience with Cloudflare.

9. Add your target Domain to your Repository settings.
Repository --> Settings --> Pages --> Custom Domain- Once your CNAME finishes propegating, your mdBook should now be accessible.

10. Flex on your peers.
- The finalized directory should look something like this:
MyRepo
|
|__ src
|   |
|   |__ attachments
|   |   |__ Pasted image 202307071.png
|   |   |__ Pasted image 202307072.png
|   |   |__ Pasted image 202307073.png
|   |
|   |__ CoolNote1.md
|   |__ CoolNote2.md
|   |__ SUMMARY.md
|
|__ README.md
|__ book.toml